Winter Wonderland Cake Recipe
This stunning winter wonderland cake brings the beauty of a winter’s day to your dessert table, combining irresistible flavors with a gorgeous presentation.
Whether you’re planning a holiday party, a winter birthday, or just want to add a little seasonal sparkle to your baking, this recipe is sure to impress.
Be sure to check out all of our cake recipes for even more show-stopping dessert ideas.
This recipe combines a fluffy vanilla base, creamy frosting, and frosty decorations to create a magical centerpiece for your winter celebrations.
Here are all of the ingredients you will need for this recipe. You will find exact amounts in the printable recipe card at the bottom of this post!


To start your cake, be sure that the butter, eggs, and cream are at room temperature for a smoother batter and fluffier frosting.
Combine the wet ingredients and dry ingredients to form a smooth batter.
Divide the cake batter into two greased 6-inch pans and bake and then let them cool completely.

Prepare the vanilla buttercream frosting.
Divide into 3 bowls to create 3 shades – white, light blue, and blue portions using food coloring.
Assemble the cake. Trim the cake tops with a serrated knife for even layers.
Place the bottom layer of the cake on a cake board anchoring it down with a small dollop of frosting to the board before placing the cake.
Stack layers with white frosting in between. Apply a thin layer of buttercream as a crumb coat to the sides of the cake and the top.
Refrigerate the cake for 20–30 minutes, or until the frosting sets and feels firm to the touch. This makes it easier to apply the final layer without disturbing crumbs.
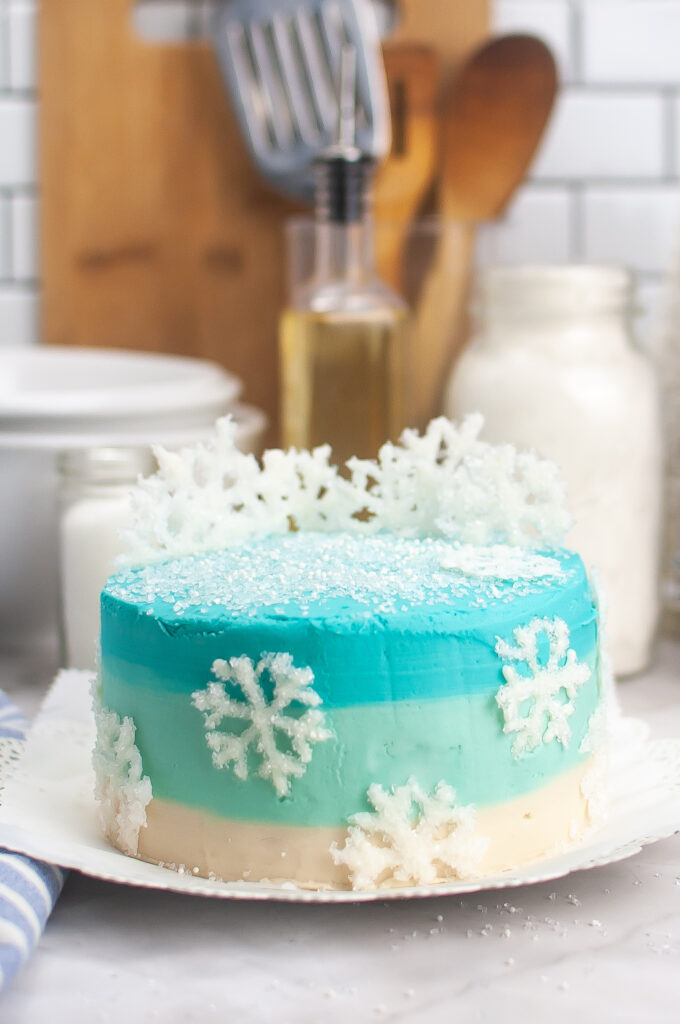
Then layer blue, light blue, and white frosting for an ombré effect. Smooth with a cake scraper at a steady angle to blend the layers of frosting smoothly. Avoid lifting the scraper while smoothing.


Finally, create your decorations.
To create the snowflakes, print the snowflake template and lay parchment paper over.
Pipe snowflakes with melted white chocolate on parchment paper, sprinkle with sugar, and let harden.
Gently place on the cake with pearl sprinkles and decorative sugar for a frosty finish.

This cake stays fresh for 2–3 days at room temperature in an airtight container or up to 5 days in the fridge. Bring it to room temperature before serving.

Don’t miss the posts below — they’re packed with delicious ideas and inspiration you’ll want to try for your next baking or cooking venture!
- Discover these delightful winter cake ideas and turn your next celebration into a magical moment—click to find your favorite dessert recipe!
- Warm up your season with these irresistible winter snack recipes — easy, cozy, and perfect for sharing!
- Bring holiday cheer to your table with these must-try Christmas cake recipes — each one is a festive showstopper!
- Indulge in the ultimate dessert experience — click to try this decadent s’mores layer cake and wow your taste buds!


Winter Wonderland Cake Recipe
Ingredients
Cake:
- 1 cup granulated sugar
- ¼ cup vegetable oil
- 2 large eggs
- 2 teaspoons vanilla extract
- ¼ cup sour cream
- 1 ¼ cups all-purpose flour
- 1 ½ teaspoon baking powder
- ½ teaspoon salt
- 2/3 cup milk
Frosting:
- 1 cup salted butter softened to room temperature
- 4 cups confectioners sugar
- 2 tablespoons heavy whipping cream
- 2 teaspoons vanilla extract
- Light Blue frosting color: 1-2 drops of blue food dye.
- Blue frosting color: 6-7 drops of blue food dye.
Decorations:
- 2-3 oz White chocolate bark
- Decoration sugar
- White pearl sprinkles
Instructions
- Begin by preheating the oven to 350°F.
- In a mixing bowl, combine the eggs, sugar, vanilla, and oil.
- Whisk everything together until well combined.
- Add the sour cream and milk to the mixture and combine thoroughly.
- In a separate mixing bowl, combine the flour, baking powder, and salt.
- Mix them together well.
- Gradually incorporate these dry ingredients into the wet mixture, stirring until a smooth batter forms.
- Be sure to scrape the sides of the bowl.
- Grease two 6 inch pans with oil and pour the batter evenly into each pan.
- For convenience, place the cake pans on a baking sheet and bake at 350°F for approximately 20 minutes.
- You can check if they are fully cooked by inserting a toothpick into the center of the cakes and ensuring it comes out clean.
- Once cooked, remove the pans from the oven and set them aside to cool completely on a wire rack before removing the cakes from the pans.
- While the cakes are cooling, prepare the frosting. In a mixing bowl, combine the butter, 3 cups of confectioners sugar, and half of the cream and vanilla.
- Mix until creamy, gradually adding the remaining sugar, cream, and vanilla while alternating.
- Increase the mixer's speed to high and whip the frosting for 5 minutes until it becomes light and fluffy.
- Divide the frosting in half.
- Set aside one half.
- Divide the other half again in 2 equal portions.
- Use each portion to create the light blue and blue frostings.
- To mix the light blue color, add 1 to 2 drops of blue food dye and mix until desired color is reached.
- To mix the blue color, add 6 to 7drops of blue food dye and mix until desired color is reached.
- Take the remaining half of the white buttercream frosting and separate one-third of it.
- Set this portion aside for any touch-ups or corrections.
- Once the cakes have completely cooled, use a cake or bread knife to carefully slice off the risen center of each cake, making them flat on top.
- Place the bottom layer on a flat surface. Add a small amount of white frosting and spread it evenly, leaving a layer about 1/2 inch thick.
- Add the second layer and place it on top of the frosted layer, making sure it aligns properly.
- Apply a thin layer of white buttercream frosting to cover the two cake layers completely.
- Smooth the frosting as desired while keeping the edges of the cakes intact.
- Pipe the blue frosting on top of the cake.
- Pipe the blue frosting on the side, top of the 1/3.
- Pipe the light blue frosting on the side, middle 2/3.
- Pipe the white frosting on the side, bottom of the third.
- With a cake scraper, evenly and gently scrape your frosting to create your ombre.
- Make sure you keep your cake scraper level, and not going up and down as it will damage the ombre effect.
- To create the snowflakes, print the template and lay parchment paper over.
- Melt the white chocolate with a splash of oil for 1 minutes. Stir until smooth or continue melting 30 seconds at a time until completely melted.
- Let cool for 5 minutes.
- Add the white chocolate to a piping bag and cut a very fine tip.
- Trace the snowflakes.
- While snowflakes are still wet, sprinkle with decorative sugar and set aside to harden.
- Once hardened, carefully lift from paper and allow unstuck sugar to fall.
- Place on the cake as desired.
- Top the cake with more decorative sugar and pearl sprinkles.
2 Comments