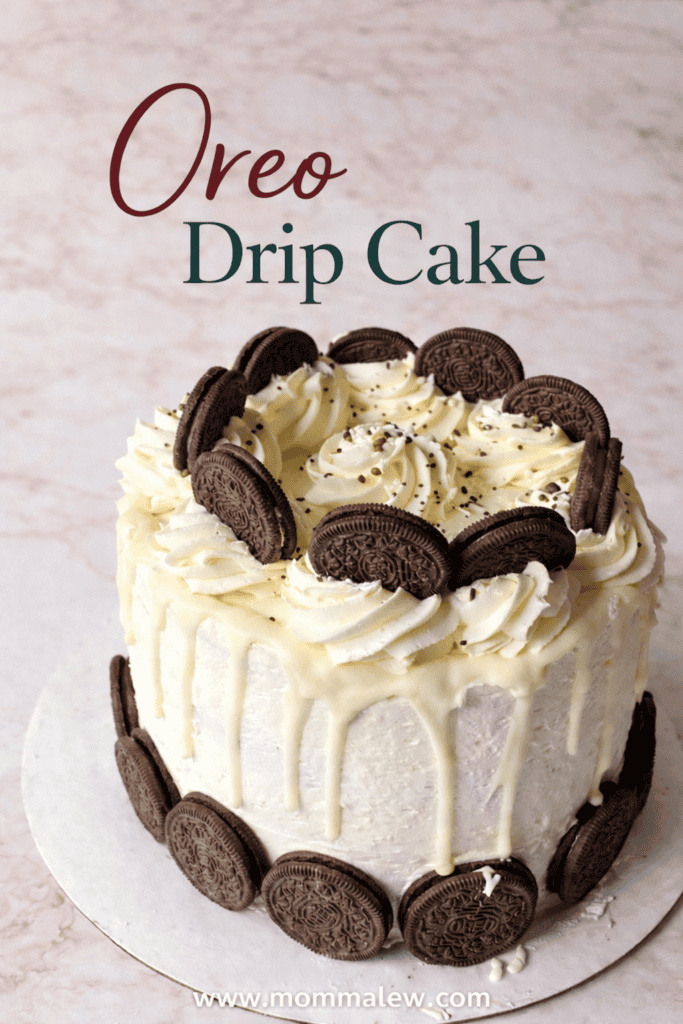
Oreo Drip Cake
An Oreo Drip Cake is the ultimate show-stopping dessert for birthdays, celebrations, and anyone obsessed with the cookies and cream flavor.
This cake recipe features moist cake layers, creamy Oreo buttercream frosting, and a rich chocolate ganache drip that makes every slice bakery-worthy.
You don’t need fancy tools or professional skills—just simple ingredients, a little confidence, and a serious love for Oreos.
As an Amazon Associate, I earn from qualifying purchases. This post may contain affiliate links, meaning I may receive a small commission at no extra cost to you when you make a purchase through my links. Thank you for supporting my kitchen!
How to Make a Drip Cake
- Starts with a soft, fluffy vanilla cake recipe enhanced with Oreo pudding and chopped cookies for that rich cookies-and-cream flavor.
- Mixing on low speed and gently fold in chopped Oreos — don’t overmix or the cake can turn dense.
- Bake the layers slightly lower than the starting temperature for a more even rise, and always test the center before removing them from the oven.
- Once baked, let the cakes rest briefly, then level and torte them for clean, even stacking. (If you need help leveling, torting, or applying a crumb coat, be sure to check out my cake decorating guide for step-by-step tips.)
- For extra stability and easier decorating, chilling or lightly freezing the layers before assembling is a game-changing trick.
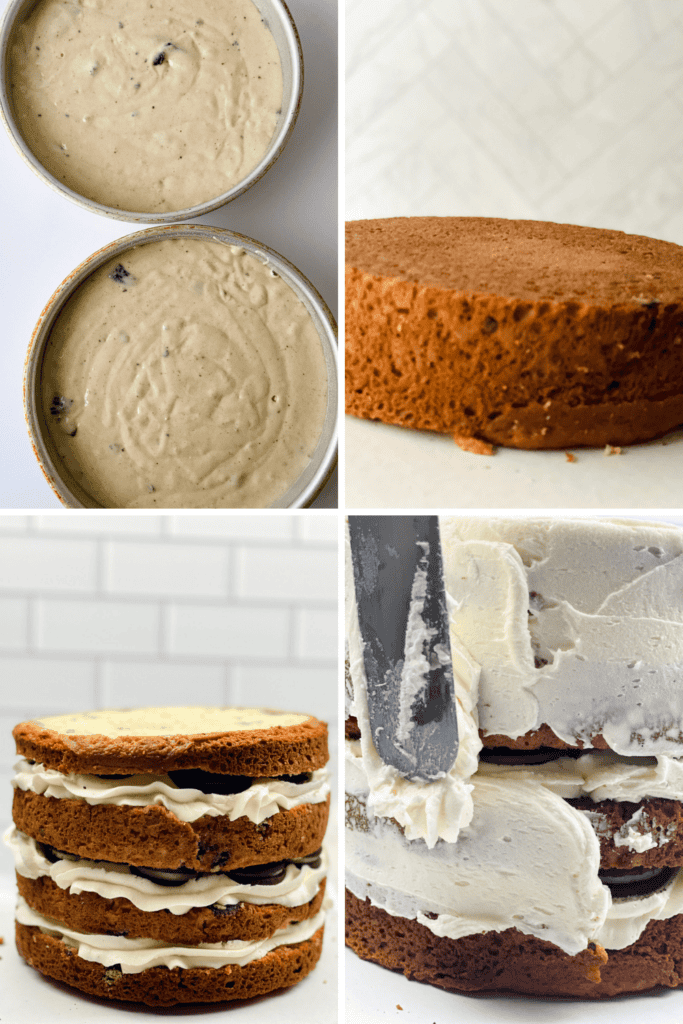
- The Oreo buttercream is where this cake really shines. Grind the cookies very fine before adding them to the frosting so you get a smooth finish — larger chunks can drag across the cake and ruin those crisp edges.
- As you stack each layer, pipe a buttercream “dam” around the edge to keep the filling in place.
- Apply a thin crumb coat, chill, then add your final smooth layer of frosting.
How to create a dripping effect on a cake?
Here’s the trick that makes it look bakery-level:
- Chill your frosted cake first. A cold cake helps the drip set beautifully.
- Let your ganache cool to a pourable (but not runny) consistency — think warm caramel, not hot syrup.
- Test one drip on the back of the cake before committing.
- Use a spoon or squeeze bottle and gently push the ganache over the edge.
- Work your way around the cake, varying pressure slightly so the drips aren’t all identical.
- Fill in the top and smooth gently with an offset spatula.
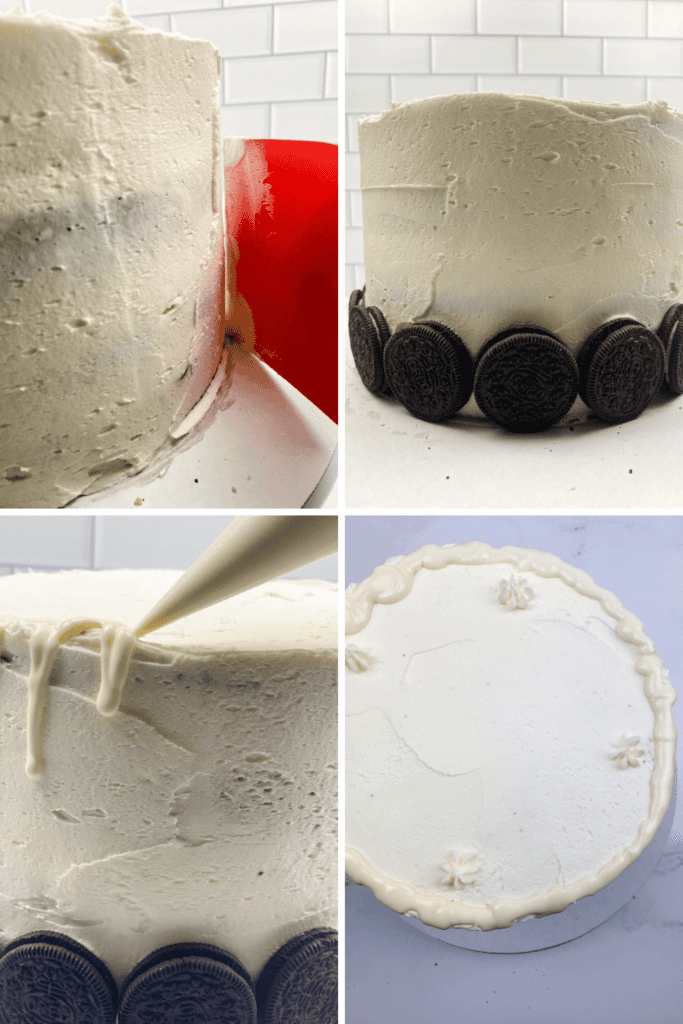
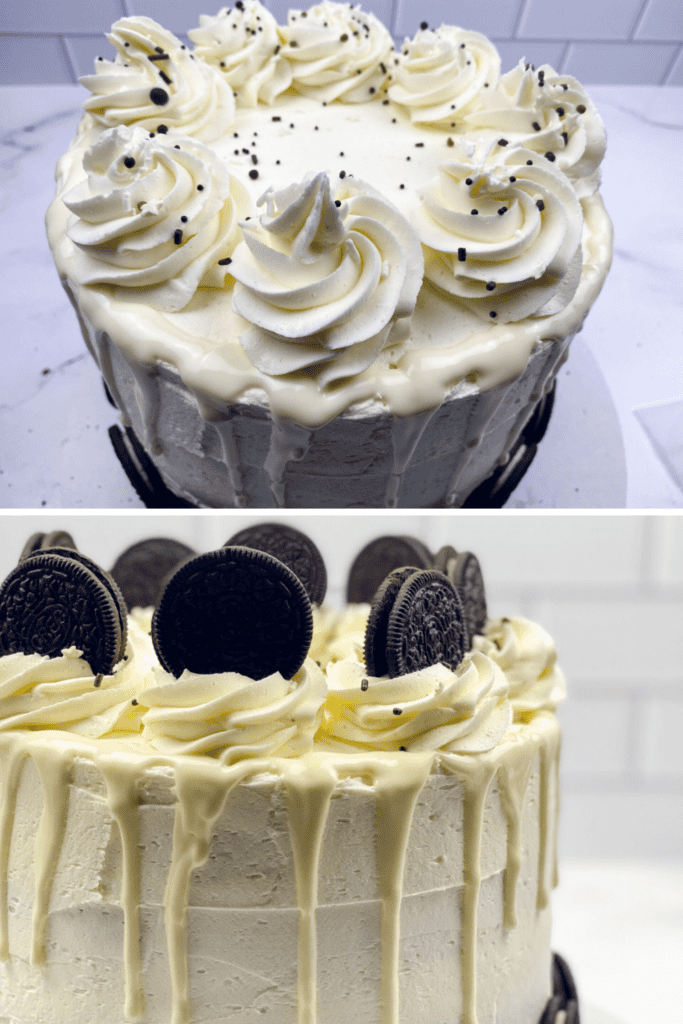
Pro tip: Each cake’s drip will look slightly different — that’s part of the charm. Perfectly imperfect always looks more natural.
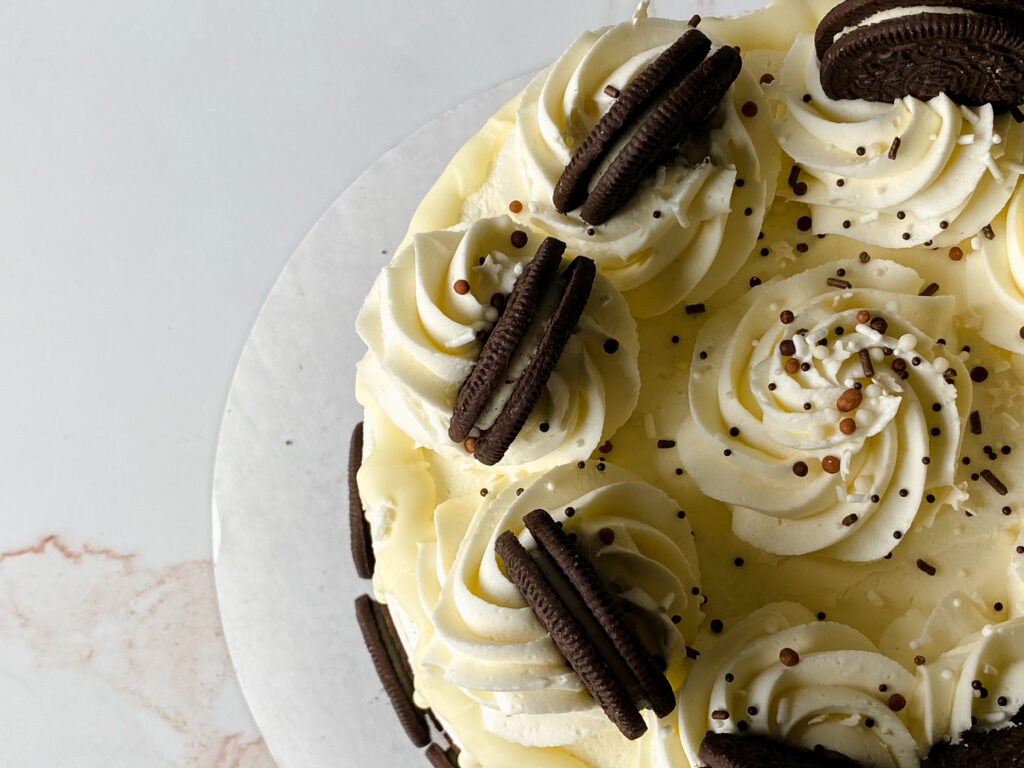
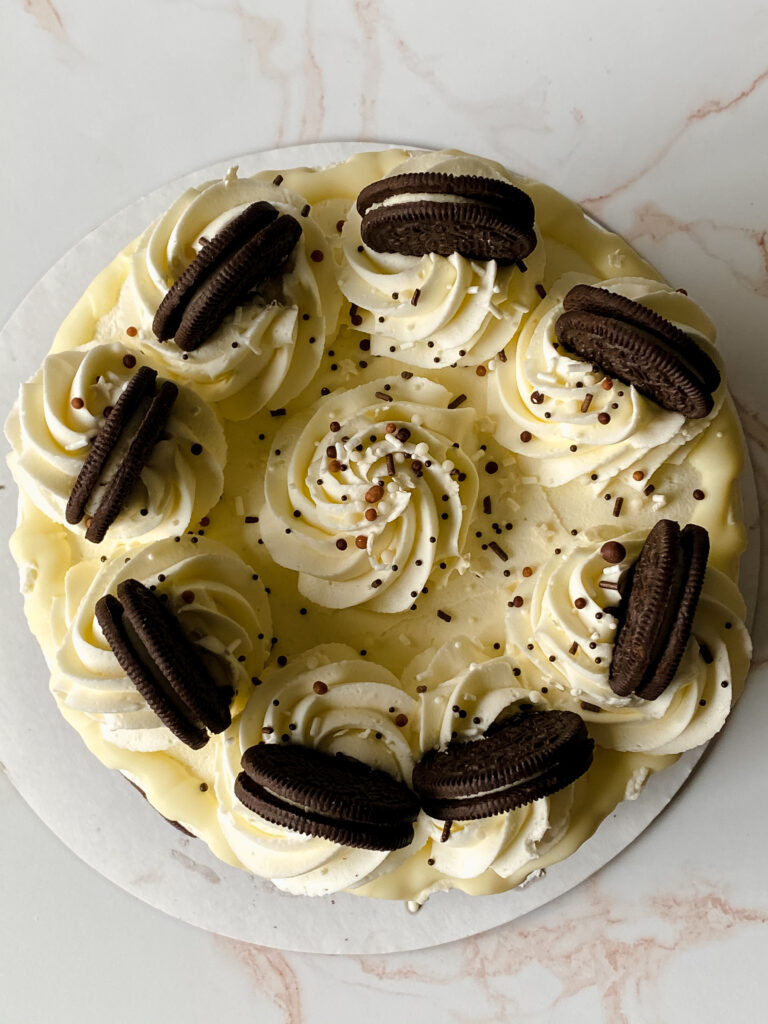
- Finish the cake with evenly spaced buttercream swirls and toppings while the frosting is fresh for that dramatic, bakery-style look.
Don’t Forget To…
- Scroll down to print the full recipe with step-by-step instructions and exact measurements.
- Check out my Kitchen Essentials for the pans, mixing bowls, and baking tools I use to make this recipe a breeze.
- Save or share this recipe on Pinterest!
E-far 8 Inch Cake Pan Set of 3, Stainless Steel Round Layer Cake Baking Pans, Non-Toxic & Healthy, Mirror Finish & Dishwasher Safe 12 PCS Cake Drums 10 Inch, 10inch Drum, Cake Boards 10 Inch Round, 1/25pcs Cake Piping Tips (1M 2D 1C 1B 1E), Decorating Supplies, Nozzles, Baking Tools for Buttercream, Icing, Birthday, Cupcake, DIY Art16 Inch Piping Bags Disposable, 100Pcs Large Pastry Bags, Frosting Bags, Cake Decorating Bags, Decorating Bags Large Piping Bags, Decorating BagsOXO Good Grips Chef’s Squeeze Bottle – SetOXO Good Grips Stainless Steel Multi-Purpose Scraper & Chopper, Dough Cutter for Pizza, Bread and Cookie Dough, Multi-Purpose Vegetable Chopper, Dishwasher-Safe Kitchen Essential


Chocolate ganache, which is a smooth mixture of chocolate and heavy cream. The cream softens the chocolate and creates that glossy, pourable texture that flows beautifully down the sides of the cake. You can use semi-sweet, milk, dark, or white chocolate depending on the flavor and look you want.
Yes, but it’s not ideal. Plain melted chocolate is often too thick and sets quickly, which can cause uneven or cracked drips. For the best results, mix chocolate with heavy cream to create ganache. This gives you a smoother texture, better control, and a softer finish when slicing the cake.
It depends on the type of chocolate you’re using. For dark or semi-sweet chocolate, use a 1:1 ratio (equal parts chocolate and heavy cream). For milk chocolate, use slightly less cream if needed. For white chocolate, use a 2:1 ratio (two parts chocolate to one part heavy cream) since white chocolate is softer and can become too thin with extra cream.
If your ganache won’t drip or stops halfway down the cake, it’s too thick. Warm it in the microwave for 5–10 seconds at a time, stirring in between, until it loosens slightly. You can also add a teaspoon of warm cream if needed to thin it out gradually.
If your ganache is too runny, it likely has too much cream or is still too warm. Let it cool at room temperature for a few minutes and test again. A properly cooled ganache should be pourable but thick enough to slowly drip down the cake without running straight to the bottom.

If you’re planning a celebration or just love having a few crowd-pleasing treats up your sleeve, be sure to check out these delicious ideas too.
- Looking for Birthday Cake Ideas? You’ll find fun, festive cakes that are just as impressive as this Oreo drip cake but simple enough to pull off at home.
- Planning a party? These Graduation Party Desserts are perfect for feeding a group and adding a celebratory touch to your dessert table.
- Need something bold and unforgettable? These Show-Stopping Desserts for a Crowd are guaranteed to grab attention and have everyone asking for the recipe.
- And if you can’t get enough cookies-and-cream flavor, you’ll love my Oreo desserts like an Oreo Poke Cake or Cookies and Cream Cupcakes for even more sweet inspiration.
Fix baking fails fast with this handy troubleshooting guide.


Oreo Drip Cake Recipe
Ingredients
- Baking Spray or Cake Release
- 2 boxes white or French vanilla cake mix
- 1 box Oreo pudding
- 6 eggs
- 2 cups water
- 1 cup vegetable oil
- 1 15 oz pack Oreos
- White candy melts or Almond Bark
- ½ pound unsalted butter room temperature
- ½ cup vegetable shortening
- 1 pound 4 cups, scooped and leveled confectioners sugar.
- ¼ cup heavy cream
- 1 tbsp vanilla extract
Instructions
- Preheat your oven to 350 and prepare pans
- Make cake according to box instructions. Add in the Oreo pudding with the cake mix.
- Chop up 7-8 Oreos and fold into the batter. Do not over mix.
- Fill cake pans 3/4 full.
- Place in oven and reduce the temperature to 340. Allow cake to bake 40-45 mins or until a skewer or butter knife comes out clean.
- Let cool completely in the pans (for one hour).
- Level the cakes while still inside of the pans. Place a cake board over the top and flip the cake out.
- For 4 layers of icing torte the cake (slice the layer in half, horizontally).
- Leave as is chill the cake layers or freeze them wrapped in plastic wrap.
- Remove cake layers from freezer or fridge and have ready to go with Buttercream, melted chocolate and sprinkles.
- Add a small amount of butter cream to the center of your cake board and lay down your first layer of cake.
- Using the Buttercream inside of your piping bag with a fitted 1M or 2D tip, build a damn of buttercream.
- Next add buttercream to the center and using an offset spatula smooth it out. Add Oreos on top, cutting them to fit.
- Fill in the entire center with cookies and lay another level of cake on top.
Repeat until cake is built. - Crumb coat the cake and let firm up in the freezer. Assess if more buttercream is needed or not at this point. If not, apply your second coat of buttercream after 5 mins.
- Add a row of Oreos around the base of the cake.
- Return cake to freezer while you melt the chocolate.
- Add melted chocolate to a piping bag or use a spoon to drip chocolate off the top. If your icing is too thick and not dripping, add a small amount of melted coconut oil or vegetable oil to thin it out.
- The chocolate will harden pretty quickly if your cake is cold. If the cake is room temperature, it will take a little while for the chocolate to set up. Pop it in the
fridge to speed this process along. - To decorate the top, melt 1 cup of the chocolate (candy melts or candy coating) in 30 second increments in your microwave stirring after each time. About 3 times will melt the chocolate fully.
- Stir to allow residual heat to melt any lingering chunks.
- Add to a piping bag. Snip the tip leaving a small space open and pipe drops of chocolate along the side of the cake.
- Imagine the top of the cake is the face of a clock. We want to pipe our buttercream swirls at 12, 3, 6 & 9.
- The cake is “marked” where I want to pipe tall buttercream swirls.
- Using a consistent pressure we want to pipe a circular pattern upwards to create a tall
buttercream swirl. - After the first 4 are piped, pipe another set of 4 in between the first set.
- Immediate add toppings
(sprinkles and cookies)
I am so eager to make this cake! Can you confirm how many cake boxes are needed for this recipe? Thanks
Hello! It’s 2 boxes of white cake mix. Enjoy! Let us know how you like it!
@momma lew, it is delicious. Definite hit with the family! Thank you for a delicious recipe!