
Oreo Cheesecake Cones
If you’re craving a dessert that’s rich, creamy, and packed with cookies-and-cream flavor—but don’t want to bake or deal with a sink full of dishes—Oreo Cheesecake Cones are exactly what you need.
This cheesecake recipe delivers that classic cookies-and-cream flavor you love, tucked into a crunchy cone that’s easy to hold, serve, and enjoy without plates or forks.
These are rich, creamy, and loaded with Oreo flavor, yet simple enough to make for busy weeknights, last-minute parties, birthdays, summer get-togethers, or anytime you need a no-stress dessert that still feels special.

As an Amazon Associate, I earn from qualifying purchases. This post may contain affiliate links, meaning I may receive a small commission at no extra cost to you when you make a purchase through my links. Thank you for supporting my kitchen!
How to Make an Oreo Cheesecake Waffle Cone
- Start by beating softened cream cheese with sugar and vanilla until smooth, then gently fold in Cool Whip for a light, creamy texture.
- Crush the Oreos finely for the filling so every bite has cookie flavor without large chunks sinking to the bottom.
- Stir in crushed Oreos, reserving a little for the topping, and transfer the filling to a piping bag.
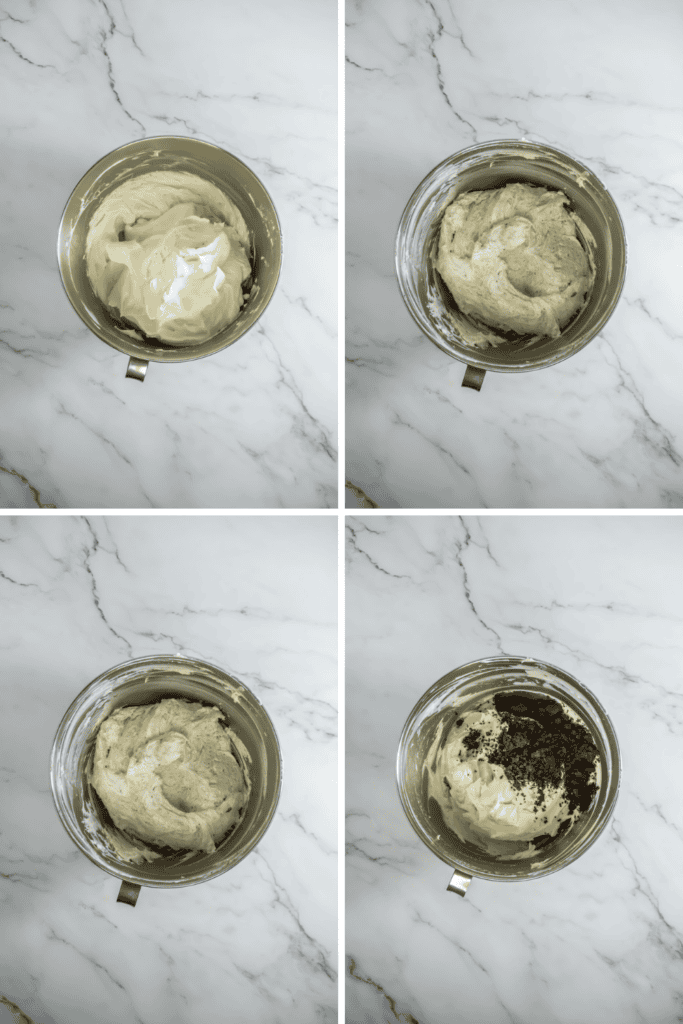
- Whisk together powdered sugar and milk to make a simple glaze.
- Pipe the cheesecake filling into waffle cones, press in a half Oreo, drizzle with glaze, and sprinkle with the remaining crushed cookies.
- Chill the cones for at least an hour to set before serving.

These cones are best made the same day. You can prepare the filling a day ahead and assemble the cones a few hours before serving.
Chilling them for a short time helps, but for best texture, assemble close to serving time and store them in an airtight container.
Freezing isn’t recommended, as the cones can become soggy once thawed.

If you love easy, fun dessert recipes, be sure to check out these other delicious ideas that are perfect for parties, holidays, or anytime you’re craving something sweet without a lot of effort.
- Oreo Dessert Recipes are a must if you can’t get enough of that classic cookies-and-cream flavor.
- You’ll also want to try no-bake recipes such as Peach Cobbler Cheesecake Cones or S’mores Cheesecake Cones for fun, flavorful treats that are perfect for parties, summer gatherings, or anytime you need a quick and crowd-pleasing dessert.

Joy Cone Classic Waffle Ice Cream Cones, 7 OunceOreo Chocolate Sandwich Cookies, Party Size, 24.16 oz
Youeon 2 Pack Acrylic Ice Cream Cone Holder with, 6 Holes Clear Waffle Cone Holder Stand, Sushi Hand Roll Stand for Party, Wedding, Bakery, Treat Table, Candy Buffet, Easy to Assemble
15 Holes Cupcake Stand- Ice Cream Cone Holder Stand with 3 Layers, Clear Acrylic & 1.26inch Diameter for Parties and Displays




Oreo Cheesecake Cones Recipe
Ingredients
- 12 sugar ice cream cones
- 16 oz cream cheese softened
- ½ c sugar
- 1 t vanilla
- 8 oz package Cool Whip
- ½ c Oreos crushed
For the Glaze
- 1 c powdered sugar
- ¼ c milk
- Additional 6 Oreos cut in half
- Additional crushed Oreo pieces
Instructions
- In a large bowl, with a hand mixer, combine the softened cream cheese, vanilla and sugar, until smooth.
- Fold in the Cool Whip until thoroughly combined.
- Add the crushed Oreo pieces into the cream cheese mixture, reserving some for the topping, and fold to combine.
- Transfer the cream cheese filling to a piping bag. Set aside until ready to use.
- In a small bowl, combine the powdered sugar and milk for the glaze.
- Whisk to combine. Set aside.
- To assemble, use the piping bag to pipe a large dollop of the cheesecake filling into each cone.
- Insert one half of the Oreo and press to stick into the top of the cone.
- Drizzle each cone with some glaze.
- Sprinkle the remaining crushed Oreos over the top of each cone for an extra crunch.
- You can also add some mini chocolate chips or drizzle with melted chocolate for an extra decadent touch.
- Place the filled cones in the refrigerator for at least an hour to allow the cheesecake mixture to set.
One Comment