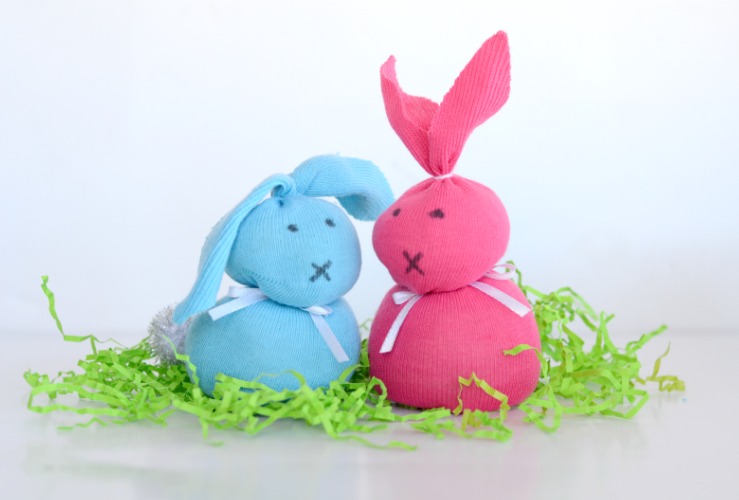
How to Make a Sock Bunny
This sock bunny craft is a cute, no-sew project that’s perfect for Easter baskets, spring decor, or a fun activity with kids. All you need is a few simple supplies and about 10 minutes.
You can personalize this easy craft idea by choosing different socks, adding little accessories like ribbons, or even stuffing them with soft material to create a cuddly bunny.
This adorable no-sew project turns an ordinary sock into a cute little bunny using just a few basic supplies like rice, rubber bands, and ribbon.
It’s quick to make, kid-friendly, and perfect for Easter baskets, classroom activities, or a creative afternoon at home.

How to Make a Sock Bunny
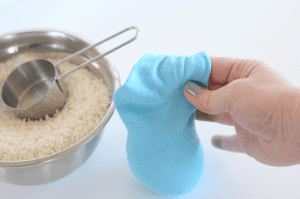
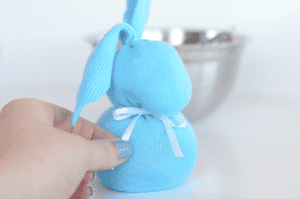
- Start by filling the heel of a small sock with rice for the bottom, then tie it off with string.
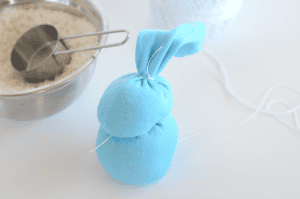
- Fill the top of the sock with more rice for the head and tie it off again.

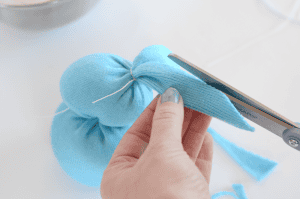
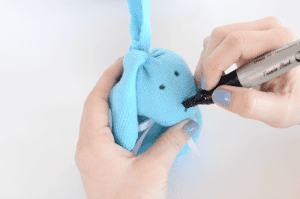
- Cut the ankle of the sock into two bunny ears, shaping them with a point at the top.
- Add a ribbon around the bunny’s neck, and use a marker to draw on facial features or glue on buttons and felt for eyes, nose, and mouth.
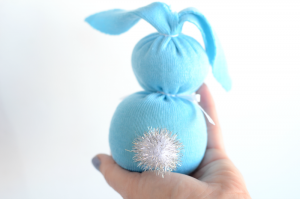
- Finish by gluing a pom-pom tail to the back.

Rice, dried beans, or lentils work well to give the bunny shape and weight.
Ankle socks or crew socks work best because they’re easy to shape and tie.
Creative Ways to Decorate a Sock Bunny
- Tie a small ribbon or bow around the bunny’s neck.
- Glue a fluffy white pom pom to the back to create a classic bunny tail.
- Draw closed eyes with long eyelashes for a sweet sleepy bunny face.
- Glue a small button or bead for a nose to add extra character.
- Add small faux flowers around the head to make a spring bunny.
- Use striped or polka dot socks to create colorful bunnies.
- Place the sock bunny in a small Easter basket with shredded paper.
- Add a little glitter glue inside the ears for sparkle.
- Fill the sock with rice mixed with dried lavender for a scented bunny.
- Make multiple sock bunnies using different size socks to create a bunny family.
240 Pcs Pompoms for Crafts Mini Pom Pom Balls Craft Pom Poms Bulk Fuzzy Pompom Puff Balls for DIY Arts, Crafts Projects, Home Decorations, Summer Holiday Party, Small Pom Poms Colores 100pcs 1 inch Mix Colorful Craft Pom Poms Balls for Hobby Supplies and DIY Creative Crafts, Party DecorationsUpgrade Office Supply UPG25764 Rubber Bands, Size 64 (3-1/2 x 1/4), 80 Bands, 1/4 lb, USARibbli 4 Rolls 3/8 Inch Gingham Ribbon, Total 40 Yards, 100% Polyester Woven Edge, (Lt.Pink/Lt.Blue/Lt.Purple/Yellow), Easter Check Use for Baby Shower, Gift WrappingHying 12 Rolls Happy Easter Ribbons for Wrapping Gifts, White Blue Bunny Ribbon for Gift Wrapping Party Decoration DIY, 3/8DECYOOL Easter Ribbon, 4 Rolls 100 Yards Satin Ribbons 10mm Wide Spring Colorful Craft Ribbon for Gift Wrapping Parties, Pink, Blue, Yellow, Green


If you’re looking for more fun Easter treats and crafts, these ideas are perfect for celebrating the season with the whole family.
- Easter Bunny Cupcakes
- Easter Rice Krispie Treat Ideas
- No Bake Easter Desserts for Kids
- Fun printable Easter activities like Easter Mazes, Tracing Worksheets, Candy Dice Game for the whole family to play or use these Easter Egg Coupons!
How to Make a Sock Bunny
Equipment
- 1 pair of scissors
- 1 Black marker
- Glue
Ingredients
- 1 small sock
- rice
- string
- ribbon
- pom moms
Instructions
- Begin by filling the heel of the sock with rice. This will be the bunny's bottom. Tie it off with string to secure the rice in place. Make sure it’s tightly sealed so it holds its shape.
- Next, fill the top of the sock with more rice for the head. Again, tie it off with string, creating a defined shape for the bunny’s face.
- Cut the ankle section of the sock straight down the middle to create two ear shapes. Trim the edges to a point to mimic real bunny ears.
- Tie a coordinating ribbon around the bunny’s neck.
- Use a marker to add facial features like eyes, a nose, and whiskers. You can also glue on buttons, felt pieces, or even use embroidery thread for added detail.
- Finally, glue a pom-pom to the back of the sock to serve as the bunny's fluffy tail.
So cute and easy. Lots of fun for Easter.
Thanks for visiting!!!!